Tuesday, April 26, 2011

iPhone Tutorial 02: Little Fishy Collages


GETTING LOST IS JUST PART OF THE PROCESS

iPhone 3GS collage

Power-users beware! What follows is a very simple introduction to the art of creating collages with an iPhone. In this tutorial I'm going to demonstrate how to:
1. Create an interesting background with just one click of an app
2. Extract an element from a photograph and collage it onto another
3. Work with blur to blend two photographs together

First, a word about "kit": I spent a year making iPhone collages before a very kind friend gave me a stylus. As I'd taken about the same amount of time using a track pad to make digital collages and scrapbook layouts before I got around to buying a graphics tablet, I'm pretty nifty and precise with my index finger tip, but a stylus certainly makes tasks such as erasing large areas from photographs (which you do a lot of when making iPhone collages) much easier and you don't strain your hand and arm quite so much. there are several models on the market now and everyone has their favourite but I'm still using my Pogo Sketch.

OK...here we go!

The image above began life as the following two photographs shot at my local aquarium supplies store...


These were "fast and dirty" shots: there are some odd colours, noise, blur, and a couple of undesirable elements but that's fine, we're going to work with them "as is" without any correction. Feel free to download them for use as you walk through the tutorial but please remember that they are for this purpose only and that the originals or work made with them still retain my copyright.

These are the apps we'll be playing with...


STEP1. TINY PLANETS: create an abstract background

Import the skull into the app, hit the Tiny Planet icon at the bottom of the screen, left hand side and...


wheeeeeeeee...


Our skull comes out of the blender looking like a piece of modern sculpture.
So what does the Tiny Tube button do? Try it!


Marvelous! We're going to work with this second version so save it to camera roll.

STEP 2. JUXTAPOSER: Extract fish from photograph and collage onto the background created with Tiny Planets

Following the on-screen prompts, import both photographs into Juxtaposer. Your screen should look like something like this:


Now Select Erase. The icon at the top right hand side of the screen, next to the undo icon, is the brush modification button. We're going to erase a large portion of the photograph so to begin with, choose a largish, opaque, hard brush...


Use Pan & zoom to get closer in...


As you get closer to the fish's body, make the brush smaller, softer and more transparent to give the fish a soft edge that will blend into the background.

You may wish to use the Move Top Image tool to move the fish into the blue area where it's easier to distinguish her from the background.


If you nibble in too far, you can always select the Unerase tool and paint some of the photograph back into the image.

Once you're satisfied with the fish, reposition and re-size her. at this point, it's also a good idea to save the fish as a "Stamp", in case you want to use it again: to find this option, select the icon in the top left hand corner > Save > Save masked top image as stamp.
Whilst in this menu, select Save Image: this will merge fish and background, and save to camera roll. Here's a close up of the little fish in her final position:


Good work! However, I am picky and despite using a soft brush to extract fishy from her original background, she still looks just a little too hard-edged and "stuck on" for my liking. So on to...

STEP 3. BLUR FX: add blur

Select Gaussian blur and use the slider to modify the strength of the effect.


By switching the mask on and off, you can see how much of the blur you're removing or applying...


...and what the effect looks like. In this instance, we're using the CLEAN brush to erase almost all of the blur effect, just leaving a soft edge at the back of the fish to blend her with the background and give a sense of movement...


As in Juxtaposer, the brushes in Blur FX can be modified for work in smaller areas and tight corners.

When you have erased most of the red mask from around and inside the fish, turn off the mask to check how it looks. If you've gone to far with the cleaning job, you can always select the BLUR tool and brush the effect back to the image where required.


Just to remind you, here's what the final collage looks like...


I am in love with this intrepid little fish. Here's a companion piece created with the Tiny Planets mash of the skull...


SWIMMING OUT OF THE SKULL

Finally, here's a collage created using just BLUR FX and JUXTAPOSER...
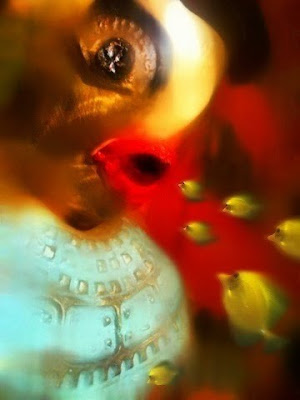


THE ONE THAT GOT AWAY
iPhone 3GS collage

I hope you've found this tutorial useful and fun. I'd love to see your collage creations so please do share links!

Digital collages with iPad and iPhone


THE FIXED POINT

iPad collage

Then I first acquired my iPhone in November 2009, I made nothing but collages with it and my camera roll fast became a rag-tag repository for photographs of rather odd objects and textures that I'd later cut, paste and blend into miniature mash-ups. Eventually, I became frustrated with the practical limitations and resolution output of most of the apps I'd been using. Also, being a flighty, creative type, I wanted to experiment with other camera apps and techniques. So, as you do, I moved on, but the lure of virtual scissors and glue is strong and I've recently returned to collage, but this time on I'm also working with my iPad. It's still a fiddly process, but as the screen is larger, it's slightly less of a strain on the eyes.
The collage above is the latest one I've done but for the sake of those of you who have only recently discovered my blog, here are some I made earlier, with my iPhone...

TIME FLUTTERS BY

A WISH

JAMIE'S BIRD


SUMMER SISTERS


A BOY'S OWN STORY


FRAGMENT 01

I'm preparing a simple tutorial that features two recent iPhone collages. It's almost ready and will be posted here later on today or tomorrow.
See you later!


Friday, April 15, 2011

iPhoneography Tutorial 01: Vintage French Street Scene


Over the last year, I've had many requests for iPhoneography tutorials and I'm finally getting down to it. Today I'm going to share the process by which I transformed this photograph, shot with my iPhone 3GS, whilst wandering around "le vieux Lille" in December 2010...


Into this...


Before we begin, a few words about technical perfection. Currently, I use an iPhone 3GS, which everyone agrees, does not have a great camera. Many iPhoneographers utilise apps designed to extend the capability of iPhone cameras but as I like to make images that look flawed in some way, I find that it helps if I begin with a less than perfect photograph. That way, any under or over-exposed areas, motion blur and odd reflections inform my compositional and processing choices. They also give me a head-start in the grunge stakes.

If you wish to work with my original photograph whilst following this tutorial, feel free to download it. However, please remember that the photograph and any processed versions of it, retain my copyright and are not to be used for any other purpose other than following the tutorial.

Ready? Ok! So here are the apps you'll need:


1. Resize, Crop and recolour: 100 Cameras in 1

Before importing an image onto this app, check the export resolution settings: Splash Screen> Options>Resolution (I choose high so that I can print the image if I wish)

This must surely rank as the most girlie iPhoneography app EVER. If you're attempting any kind of diet or Lenten abstinence, I recommend that you abandon this tutorial right now! 100 Cameras in 1 starts up with a sweet little tinkly tune that might make you think that you've downloaded a bliss-out meditation app by mistake. Once you've imported a photograph, you're greeted with an image depicting a stack of delicious-looking biscuits accompanied by the message: "baking cookies mmmm". The iPad version is even more potentially hazardous, tempting us with seductive Belgium Chocolates. You have been warned!


Once you've imported a photograph, you can resize/crop it within the app before browsing through 100 poetically-named presets, grouped into sets of ten
Choose ZEN>"where the thunderdome shook the earth"

The next screen provides a slider so that, if you wish, you can modify the preset
We are going to select the lowest setting and save to camera roll.


This app is described as a game and has some kind if point-scoring system. As I’m not remotely competitive, I haven’t looked into this. If someone tells me I’ll win real cookies and chocolates if I collect points, then obviously, I will pay more attention.


2. Add texture: PIC GRUNGER

Once again, before importing a photograph into this app, select the RESOLUTION button on the splash screen to set your desired output resolution. Happy? Ok, now import!


In EFFECTS choose AGED


The preview screen displays the photo with applied effect and offers further opportunities to modify it. Select STYLE


select BLOCK PARTY (yay!)


Select STRENGTH and adjust with the slider
(I chose a low setting: don't want the neighbours complaining about the noise)


3. Rotate image in PHOTOGENE and save to camera roll


I incorporate rotation into my work flow so that any generic app presets such as grunge effects and light leaks won't be applied in the same areas of every single image and hopefully, the apps used will be less recognisable.


4. Adjust colour and add extra texture in PICTURE SHOW


Choose INDIGO HALO
then
select the icon at the bottom of the screen named STYLE


Select the following settings
Frame = no frame, Light = No light leak, Noise = Scratch, Vignet = none
Hit DONE and save to camera roll (SHARE)
Now the photograph should look like this...


5.We're going to add some atmospheric blur in LoMob but we have to be a little tricksy about it. Here's why: the screenshots below illustrate where the blur would be applied to the photograph in its original layout...


I love the blur effect you get with the LoMob Tri-Black film preset BUT I want to apply it to the left-hand side of the photograph rather than the right, so that the far end of the street is out of focus, and the grunge-texture in the lower left-hand corner is softened.
So...
import the photograph back into PhotoGene and
rotate to look like this...


6. Add atmospheric blur to the desired part of photograph in LOMOB


Select CLASSIC VINTAGE> TRI-BLACK


Anyone who remembers those wonderful point and click computer games MYST and RIVEN will feel a hint of nostalgia doing this next bit, because you're looking for an invisible button.
Touch the screen in the space shown in the above screenshot


Shazam!
A set of buttons appear. Use these to switch elements of the preset on and off. If you copy the settings in the screenshot above and then hit the little wheel button on the bottom left of the screen, you'll switch off the B&W and vignette effects leaving just the blur
. However, you won't see the blur until you render a preview by hitting the green arrow/return icon on the bottom right of the screen. In case you're thinking that's a bit complicated, it is. Friendly message to LoMob developers: please get it sorted!


7. Flip and Rotate in PHOTOGENE (dizzy? I promise this is the last time)

I decided that I preferred the photograph's composition in reverse from the original and so saved it like this...


That's it, all done!

I hope you've found this tutorial both useful and enjoyable. Please do send feedback and if you've processed any of your own photographs whist following the tutorial, I'd love to see the results!


Monday, April 11, 2011

Making An Exhibition Of Myself


JANUARY WALKING: OUT OF SIGNAL
shot and processed iPhone 3GS


PILGRIMS OF LIGHT: LAST ASCENT TO THE RED CROSS
shot and processed iPhone 3GS


TOUCH
shot and processed iPhone 3GS


Jo Archer recently asked me if I'd had any of my work exhibited and I'm delighted to report that over the last 12 months, examples of my iPhoneography have featured in five exhibitions in Germany (Berlin); USA (New York and Kansas); Italy (Milan); and here in the UK (Bristol). Three of the photos are posted above.

The first two were selected for the Royal West of England Academy Open Photography 2. Although I can't be absolutely sure whether mine were the only iPhone images on display, they were certainly the only two to be labled as such. Some of you might recall that January Walking: Out Of Signal was shot on New Year's Day, when I was lost, halfway up a Welsh hillside, and my iPhone was well and truly out of signal. The friend who we were with at the time has since assured us that he now knows the hill at the back of his house as well as he knows the back of his hand. The second photograph depicts a journey that we know quite well as we have taken it once for the last eight years. Pilgrims Of Light, Last Ascent To The Red Cross was shot during our last night at the 2010 Lyon Festival des Lumières, as we made our way up the side of the steep cliff that led back to our hotel in the Croix Rousse District.

Last Ascent To The Red Cross is currently also on display, along with Touch, at the Pixels At An Exhibition Show in Kansas. Touch was originally a screenshot of an erotic film clip playing on my Macbook.

Since last year, when my first iPhone collage tutorial was published in Somerset Digital Studio, I've had lots of requests for more. It's long been my intention to build a tutorials website but ill-health has led to it being a very stop-start project. However, I'm just begining to compile new tutorials and hope to roll them out over the next few months, possibly on a seperate blog or site as I'm also getting back to Digi-Scrapping and think there's a need to keep the two activities seperate and so easier to find.

Here's the photograph I'm currently writing a tutorial for


and here's a Hipstamatic shot of the view through my studio window, where I'm sitting now...


Posted using BlogPress from my iPad:

Saturday, March 26, 2011

The Kindness Of Strangers


A package from Poland, tagged and tied with string! What could it be?


An exciting stash of collage materials with special instructions: select 12 items from the box and replace them with 12 more; write a message in the little booklet enclosed; forward the package on to another artist who's name you've been given (in this instance, it was Rebecca from Barnsley). Finally: make a collage incorporating your chosen items and post on your blog.


Sometime before Christmas, I'd signed-up to take part in one of my friend LaWendula's postal exchanges: this one is named "The Collage Box Project". LaWendula's clever initiatives to bring artist-bloggers together never fail to energize my creativity and I wanted to make something that reflected the spirit of generous exchange and imaginative recycling that they brilliantly embody. So I chose 12 snippets that I thought would make a useful digital collage kit that could be shared with you all and used to create even more artworks. Once I'd scanned my chosen, here's what I did...


I made two textured journal pages. The photo above was taken while I was working. Below is a scan of one side of the double-spread textured pages


While I was preparing the journal page, I also made a separate texture on heavy card


Once scanned, this became the starting point for...


A set of digital papers. It's been so long since I fired-up Photoshop, I wondered if I'd remember how to use it. This was my first time working with with CS5 since I upgraded, which made things even more interesting...


For the paper above, I incorporated German algebraic text: scanned from another gorgeous vintage paper in the collage box. I think I'll also use this one for the front of a greetings card
.

Please don't hold your breath for the kit: it's still work in progress because naturally, once I'd made a couple of papers, I got side-tracked and wanted to play with them myself, to see if they would work.
..

Here's some digital mixed-media experimentation using the Brushes app on my iPad


Finally, I made a scrapbook layout, once again in Brushes on the iPad. The photograph is used by kind permission of a dear Twitter-friend...


Thank you Joanna in Poland for passing the box on to me.

If you'd like to see what others have created with their chosen snippets, take a trip to LaWendula's inspiring blog and follow the links, but don't leave here yet because in my last post, I promised that I would finally reveal the name of the person who'd won my second bloggerversary draw. Actually, as I'd left it so long, I decided that I'd draw two names out of the hat and the lucky winners are...drum roll...ta da!

Kelly Marzycki of Imbue Studio

and...

Deb (of Dryad Art: really sorry to the other Deb!)

Kelly and Deb, please feel free to take a good look around my Flickr stream and choose a print of any of my work, including older digital collages but please bear in mind that much of my early iPhoneography was done at very low-resolution and will not print well. Having said that, if you'd really like one of those pieces, let me know and I'll see what I can do for you before asking you to make a second choice.

Now, some of you have asked if my cat is still in the Land Of The Living. I'm overjoyed to share the news that Tinky has perked-up considerably since my last post. However, she remains a poorly little creature and is now VERY fussy about her food. The general rule is that if it is expensive, warm, and hand-fed, she's interested, but anything less, forget it! Having survived a near-death experience, she probably imagines that she's died and gone to Heaven!

Here is the link to LaWendula's blog

Friday, March 11, 2011

Time To Say Goodbye


REMAINS OF THE DAY: RALPH'S LAST TUNES

shot and processed iPhone 3GS


FOLLOWING SYLVIE HOME

shot iPhone 3GS, processed iPad


DARK MATERIALS

shot and processed iPhone 3GS

The past month has been a time of saying goodbye in the most final of ways. On February 18th, my family gathered in a tiny Welsh chapel to sing "The Old Rugged Cross" and pay our last respects to the memory of my mother's "baby" sister Sylvia.
Because her mum was a passionate supporter of the Llanelli Rugby team who are also known as "The Scarlets", my cousin Ann, Sylvie's only daughter, dressed for the funeral in a beautiful Red Trench Coat: a bright and fitting tribute to the most sweet-natured women I've ever known: always smiling, never complaining, despite suffering considerable disability due to Diabetes. What none of us, including Auntie Sylvie, knew until just before she died, was that she was also suffering from Cancer.

Last Wednesday, we said goodbye to my wonderful "father-in-law" Ralph who, for several years, had been putting up a brave fight against Prostate Cancer. Ralph was a shy man of many talents, not least of which were his skills as a Magician. We wanted the funeral to be a celebration of his life, so
Mollie, my "mum-in-law" wore black "but only because he liked me in the colour" with touches of red and white, to match the silks they used in their magic act. In remembrance of Ralph's happy National Service Days in Hong Kong, we chose a bamboo casket, adorned with flowers that were white with touches of red and black. My partner Michael made the broken wand that traditionally sits atop the funeral casket of a magician and travels with him to the grave. Scott Joplin's "The Entertainer" greeted us as we entered the crematorium for the committal and we smiled, knowing that Ralph would be pleased we hadn't chosen anything solemn and sad.

As I write this, Tinky, our little, old cat, is sleeping on the garden bench. For several days now, she has hardly moved, eaten or drank. Every so often, I stoke her for a while and whisper that I love her, but she's an independent little soul and it's quite clear that she wants to die in her own way: quietly and with as little fuss as possible. For the third time in almost as many weeks, my heart is breaking and I cannot stop the tears, but I know one thing: our loved-ones are temporary gifts that we must cherish while we may, not just at life's end and by the grave-side. These "goodbyes" have reminded me
that life is short and precious. It seems only yesterday that I was thanking my Auntie Sylvie for a fifteenth birthday gift brought all the way from Hong Kong; meeting my lover's father for the first time; or sitting in a Summer garden, enchanted by the beautiful little tortoiseshell cat who had just jumped over the garden fence to say "hello". My Nan used to say "We only pass this way once" and when the pain has passed, I really do have to try to get on with my life, despite all its challenges.