

GETTING LOST IS JUST PART OF THE PROCESS
iPhone 3GS collage
Power-users beware! What follows is a very simple introduction to the art of creating collages with an iPhone. In this tutorial I'm going to demonstrate how to:
1. Create an interesting background with just one click of an app
2. Extract an element from a photograph and collage it onto another
3. Work with blur to blend two photographs together
First, a word about "kit": I spent a year making iPhone collages before a very kind friend gave me a stylus. As I'd taken about the same amount of time using a track pad to make digital collages and scrapbook layouts before I got around to buying a graphics tablet, I'm pretty nifty and precise with my index finger tip, but a stylus certainly makes tasks such as erasing large areas from photographs (which you do a lot of when making iPhone collages) much easier and you don't strain your hand and arm quite so much. there are several models on the market now and everyone has their favourite but I'm still using my Pogo Sketch.
OK...here we go!
The image above began life as the following two photographs shot at my local aquarium supplies store...


These were "fast and dirty" shots: there are some odd colours, noise, blur, and a couple of undesirable elements but that's fine, we're going to work with them "as is" without any correction. Feel free to download them for use as you walk through the tutorial but please remember that they are for this purpose only and that the originals or work made with them still retain my copyright.
These are the apps we'll be playing with...

STEP1. TINY PLANETS: create an abstract background
Import the skull into the app, hit the Tiny Planet icon at the bottom of the screen, left hand side and...

wheeeeeeeee...

Our skull comes out of the blender looking like a piece of modern sculpture. So what does the Tiny Tube button do? Try it!

Marvelous! We're going to work with this second version so save it to camera roll.
STEP 2. JUXTAPOSER: Extract fish from photograph and collage onto the background created with Tiny Planets
Following the on-screen prompts, import both photographs into Juxtaposer. Your screen should look like something like this:

Now Select Erase. The icon at the top right hand side of the screen, next to the undo icon, is the brush modification button. We're going to erase a large portion of the photograph so to begin with, choose a largish, opaque, hard brush...

Use Pan & zoom to get closer in...

As you get closer to the fish's body, make the brush smaller, softer and more transparent to give the fish a soft edge that will blend into the background.
You may wish to use the Move Top Image tool to move the fish into the blue area where it's easier to distinguish her from the background.

If you nibble in too far, you can always select the Unerase tool and paint some of the photograph back into the image.
Once you're satisfied with the fish, reposition and re-size her. at this point, it's also a good idea to save the fish as a "Stamp", in case you want to use it again: to find this option, select the icon in the top left hand corner > Save > Save masked top image as stamp.
Whilst in this menu, select Save Image: this will merge fish and background, and save to camera roll. Here's a close up of the little fish in her final position:

Good work! However, I am picky and despite using a soft brush to extract fishy from her original background, she still looks just a little too hard-edged and "stuck on" for my liking. So on to...
STEP 3. BLUR FX: add blur
Select Gaussian blur and use the slider to modify the strength of the effect.

By switching the mask on and off, you can see how much of the blur you're removing or applying...

...and what the effect looks like. In this instance, we're using the CLEAN brush to erase almost all of the blur effect, just leaving a soft edge at the back of the fish to blend her with the background and give a sense of movement...

As in Juxtaposer, the brushes in Blur FX can be modified for work in smaller areas and tight corners.
When you have erased most of the red mask from around and inside the fish, turn off the mask to check how it looks. If you've gone to far with the cleaning job, you can always select the BLUR tool and brush the effect back to the image where required.

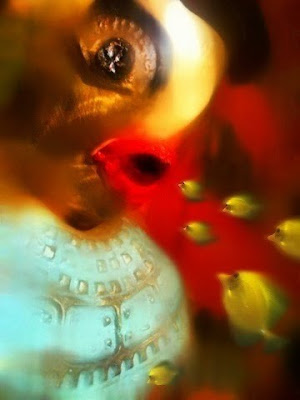
Just to remind you, here's what the final collage looks like...
I am in love with this intrepid little fish. Here's a companion piece created with the Tiny Planets mash of the skull...

SWIMMING OUT OF THE SKULL
Finally, here's a collage created using just BLUR FX and JUXTAPOSER...
THE ONE THAT GOT AWAY
iPhone 3GS collage
Finally, here's a collage created using just BLUR FX and JUXTAPOSER...

THE ONE THAT GOT AWAY
iPhone 3GS collage
I hope you've found this tutorial useful and fun. I'd love to see your collage creations so please do share links!
1 comment:
You come up with some great images, but since I stick to digital camera and land line, I just get to admire!
Post a Comment